 Tweet
Tweet
 Email
Email
 Summarize with AI


WooCommerce to Shopify Migration Checklist: Start Here
Migrating from WooCommerce to Shopify isn’t just a data transfer—it’s a full-on store transformation.
And if you’re not careful, that transformation can tank your SEO, break your product pages, or confuse loyal customers.
But it doesn’t have to be a nightmare.
This step-by-step WooCommerce to Shopify migration checklist walks you through everything from prepping your store and choosing the right tools to preserving rankings and avoiding common launch-day disasters.
Whether you’re a solo founder, part of an agency, or managing the process in-house, this guide gives you a proven roadmap to switch platforms without losing momentum.
Why Migrate from WooCommerce to Shopify?
Store owners switch to Shopify to simplify operations, boost mobile performance, eliminate plugin issues, and access 24/7 support—while scaling more easily than with WooCommerce.
WooCommerce gives you flexibility—but flexibility comes with baggage.
If you’re spending more time patching plugins, chasing updates, or worrying about hosting than actually growing your store, it might be time to switch.
Shopify simplifies it all.
Common Reasons Store Owners Make the Switch:
- No server headaches. Shopify takes care of hosting, performance, backups, and security—so you don’t have to.
- Updates that just… happen. No patching plugins or worrying if an update will break your site.
- Cleaner mobile experience. Shopify’s themes load faster and are built for conversions—especially on mobile.
- All-in-one dashboard. Inventory, marketing, analytics—it’s all there, built in.
- Real support, 24/7. No more chasing forum threads or freelance devs when something breaks.
The short version? Shopify lets you focus on sales—not site maintenance.
Step 1: Plan Your WooCommerce to Shopify Migration
Don’t jump straight into moving data or installing apps. The first step is to map out the WooCommerce to Shopify migration.
The biggest migration mistakes don’t happen during import—they happen before it even starts.
Skipping prep means you risk losing SEO, breaking URLs, or wasting hours redoing what could’ve been mapped out in minutes.
Here’s how to get your plan in place.
1. Assess Your Current WooCommerce Store
Think of this as your migration prep list.
Before anything moves, walk through your current WooCommerce setup and make a full inventory to avoid missing data, broken functionality, or Shopify features you assumed would exist (but don’t).
What to Review:
- Products & Categories
Go through every product and variant—make sure names, descriptions, pricing, SKUs, images, and tags are ready to move. If your WooCommerce site uses categories, tags, or filters, write them down before you migrate. You’ll need that list to rebuild the same structure in Shopify so products stay organized and customers can find them easily. - Customers & Orders
Export your customer list and order history. Shopify allows you to import both, but only if they’re clean and well-formatted. - Pages & Blog Content
List all the content you plan to keep—FAQs, policy pages, blogs, and landing pages. These aren’t always included in automated migrations, so flag anything important. - WooCommerce Plugins & Features
Look at what’s powering your store today—upsell engines, custom checkout flows, wishlist features, subscriptions, etc. If it’s plugin-based, you’ll likely need a Shopify app (or a developer) to replicate it.
How to Tell Which Plugins Need Replacing
Shopify doesn’t use WordPress plugins, so any WooCommerce add-ons will need a replacement or workaround.
Here’s how to assess what stays, what goes:
- Is there a Shopify app that does the same thing?
Example: You may use Smart SEO or SEO Manager in place of Yoast SEO. - Does Shopify already offer this natively?
Built-in features like abandoned cart emails, discount codes, and basic shipping rules don’t require extra apps. - Do you have custom features?
If it’s something like subscription logic or custom pricing, note it—it may require a developer to rebuild on Shopify.
Mapping this out early saves you time and budget during setup
2. Back Up Your Data Before You Move
Before touching anything in your store, make sure everything’s backed up.
Things break. Data gets dropped. But with a full backup, it can be fixed fast.
Here’s what needs to be copied before a migration:
- All products and images
- Customer info and past orders
- Blog posts and other content pages
- Theme settings and plugin data
- And the full database
How to Back Up WooCommerce Stores
You’ve got two ways to do this. We usually go with plugins—they’re fast, and they catch more data.
Option 1: Use a Backup Plugin (Recommended)
- Duplicator: Makes a full copy of your site—products, orders, pages, the whole thing.
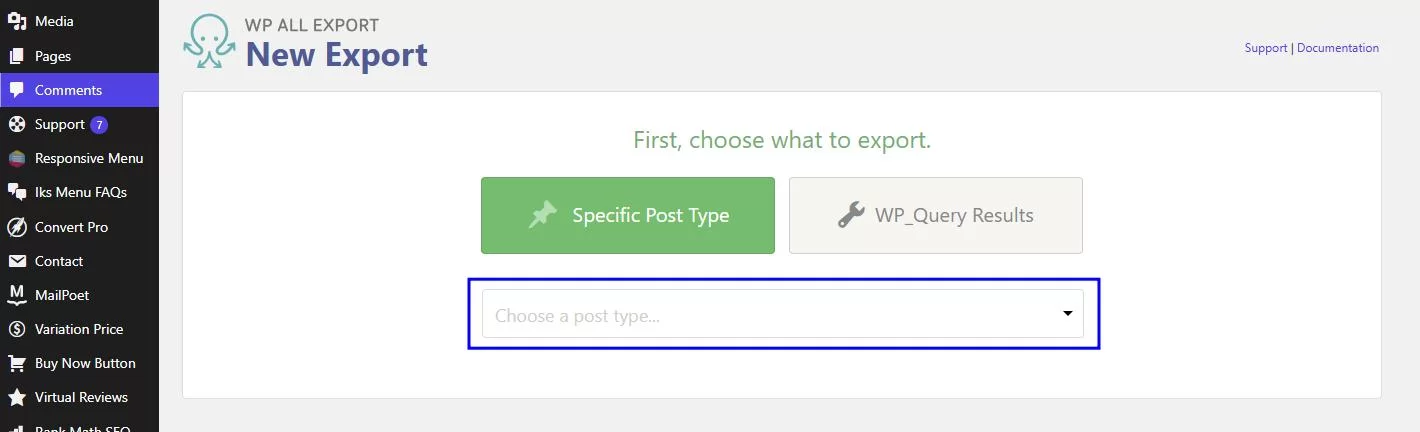
- WP All Export: Great for exporting specific data, like customers or product info, into a CSV file.
Option 2: Do It Manually
You can also do it manually by following the steps below:
- Products: Go to WooCommerce → Products → Export
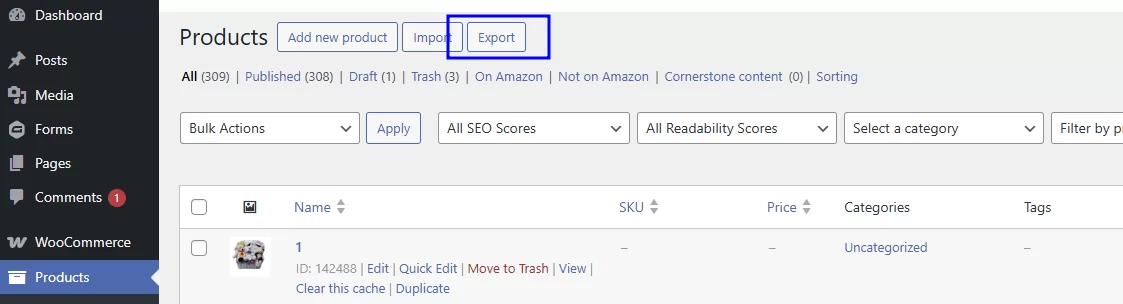
A WooCommerce Products Export Interface
- Orders & Customers: WooCommerce → Orders → Export

A WooCommerce Orders Export Interface
- Pages & Blogs: Use the WordPress export tool, or just copy and paste content into a doc
A WooCommerce Content Export Interface
One More Thing:
If your store uses subscriptions or memberships, make sure to export those too. Shopify doesn’t handle recurring payments on its own—you’ll need a special app for that later.
3. Choose the Right Shopify Plan (Canada)
You can’t skip this step: the Shopify plan you pick right before—or during—your migration affects your budget, features, and speed-to-launch.
It’s not just about cost; it’s about setting yourself up for smart scaling.
Here’s how each plan breaks down in Canadian dollars:
Shopify Plans and Pricing 2025 |
||
|---|---|---|
| Plan | Monthly Price (CAD) | Highlights |
| Basic | $49 (annual $37) | Everything you need for a full store—products, checkout, apps, shipping discounts, and 24/7 support |
| Grow | $132 (annual $99) | Adds features like up to 50% in shipping discounts, 5 staff accounts, and lower transaction fees |
| Advanced | $517 (annual $389) | Ideal for high-volume stores—offers custom reporting, better shipping logic, and tighter fees |
| Plus | From $2,300 USD ($3,100 CAD) | Enterprise-level: headless, automation tools, priority support, wholesale, and B2B features |
Quick Takeaways (Not an AI roadmap—just clear, grown-up advice)
- If you’re just starting, Basic is your go-to. Affordable, startup-friendly, and covers all essentials.
- If you’re already selling or onboarding a team: Grow gives you breathing room—staff accounts, better support, and shipping savings.
- Doing serious volume: Advanced gives you the tools to scale, with analytics, custom workflows, and better rates.
- Huge catalogue, complex logistics, or global ambitions? Shopify Plus handles all that—with a dedicated team to help you move fast and stay custom.
Step 2: How to Set Up Your Shopify Store Before Migration
Always start by preparing your Shopify store first. This way, when moving the data from WooCommerce, everything runs smoothly and nothing falls through the cracks.
Create the Shopify Account and Pick a Theme
- Go to Shopify.com and begin a free trial.
- Choose your store’s name—it becomes the temporary myshopify address, like yourstore.myshopify.com. This keeps things simple as we start.
- Fill in the basics:
- Business name
- Time zone and currency
- Contact and tax info
These small details set everything in motion correctly.
Next, choose your store’s look:
- Head to the Shopify Theme Store and look for a theme that fits your brand.
- Use Shopify 2.0 themes, because they let you move sections around easily and load fast.
- If none match there, check ThemeForest or Out of the Sandbox for more options.
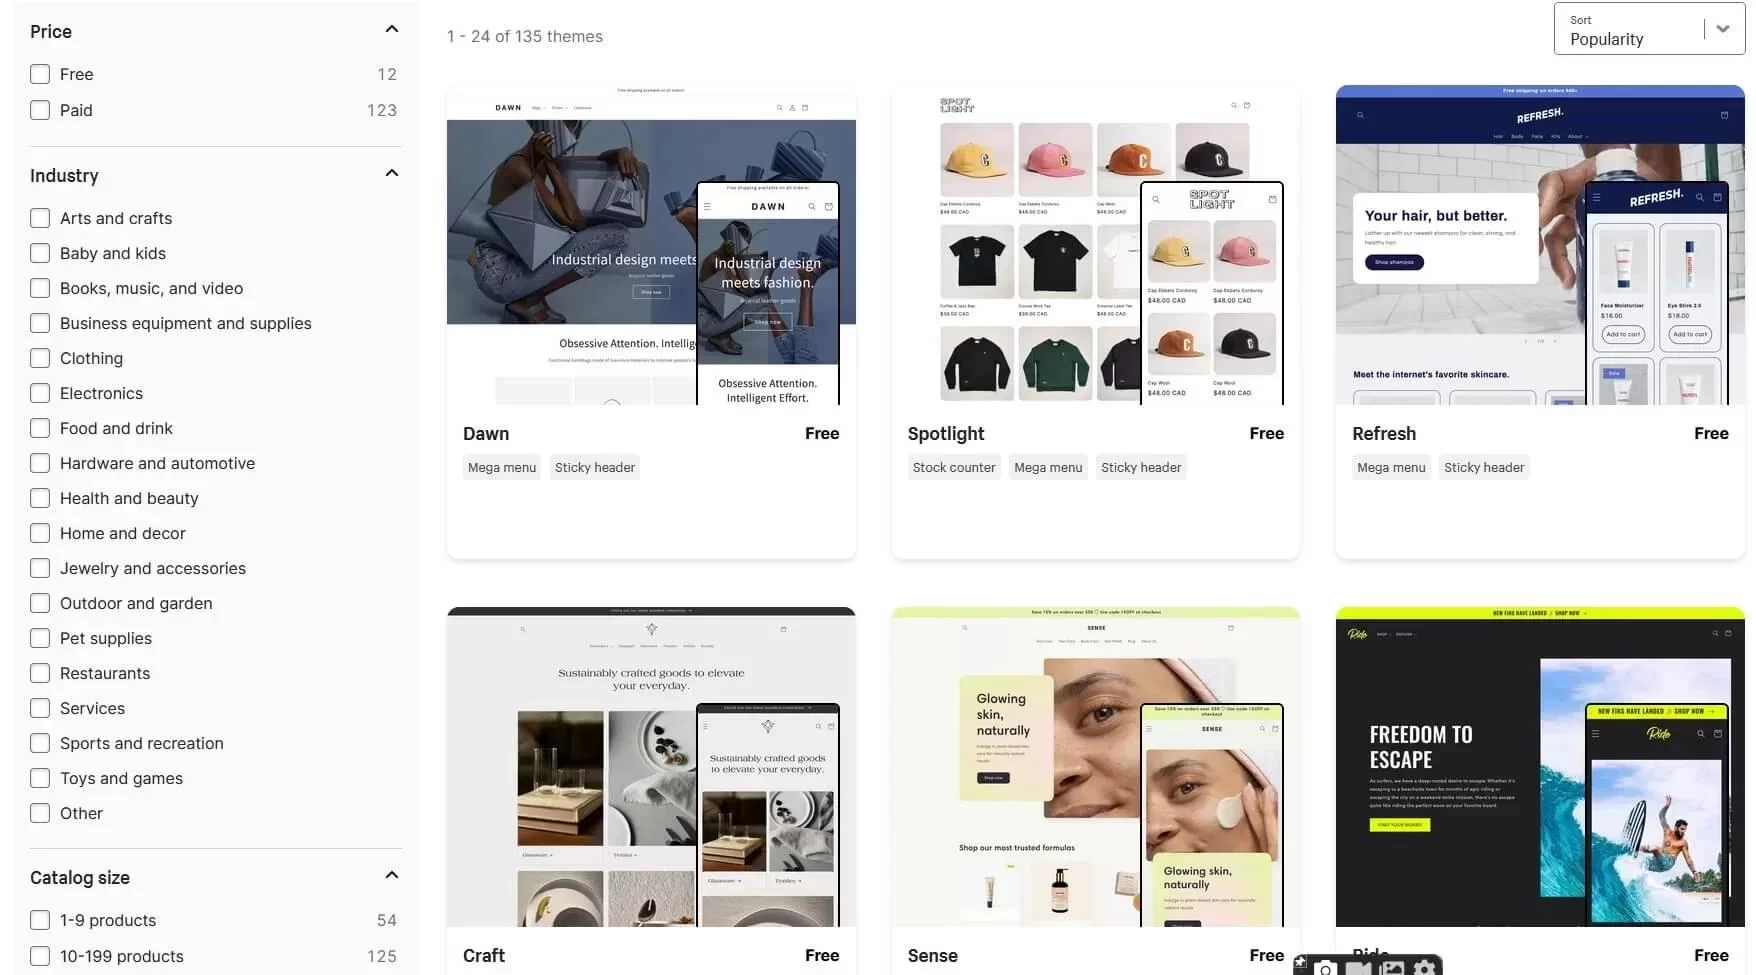
Shopify Themes Store
Need help deciding between free, paid, or custom themes? Check our Free vs Paid vs Custom Shopify Themes
Set Up the Theme So It Just Works
Once the theme is picked:
- Go to Online Store → Themes.
- Tweak colours, layout, and fonts by clicking on Customize
- View it on desktop and mobile to make sure it looks great everywhere.
That gives a clean base to move your content into.
Configure Payments & Shipping
First, Payments:
- Go to Settings → Payments.
- Pick a provider—usually Shopify Payments if available, because it keeps fees lower.
- Other options: PayPal, Stripe, or Buy Now, Pay Later, like Klarna.
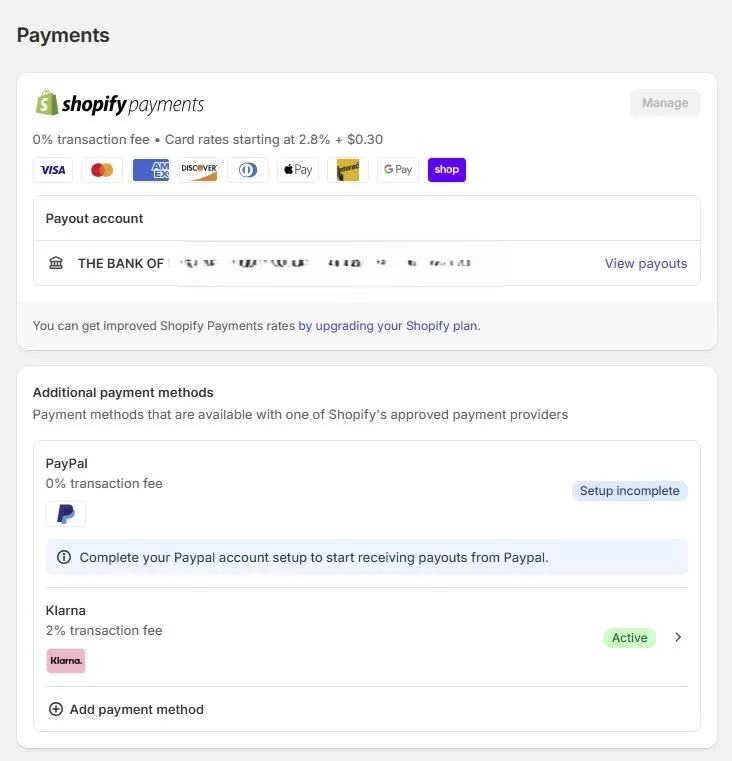
Shopify Payment Gateway Settings Interface
Then, Shipping & Taxes:
- Move to Settings → Shipping and Delivery.
- Set up ways you’ll charge shipping: flat rate, weight‑based, or live rates from UPS, FedEx, etc.
- Make sure tax rules are set for your location—Shopify doesn’t do this automatically.
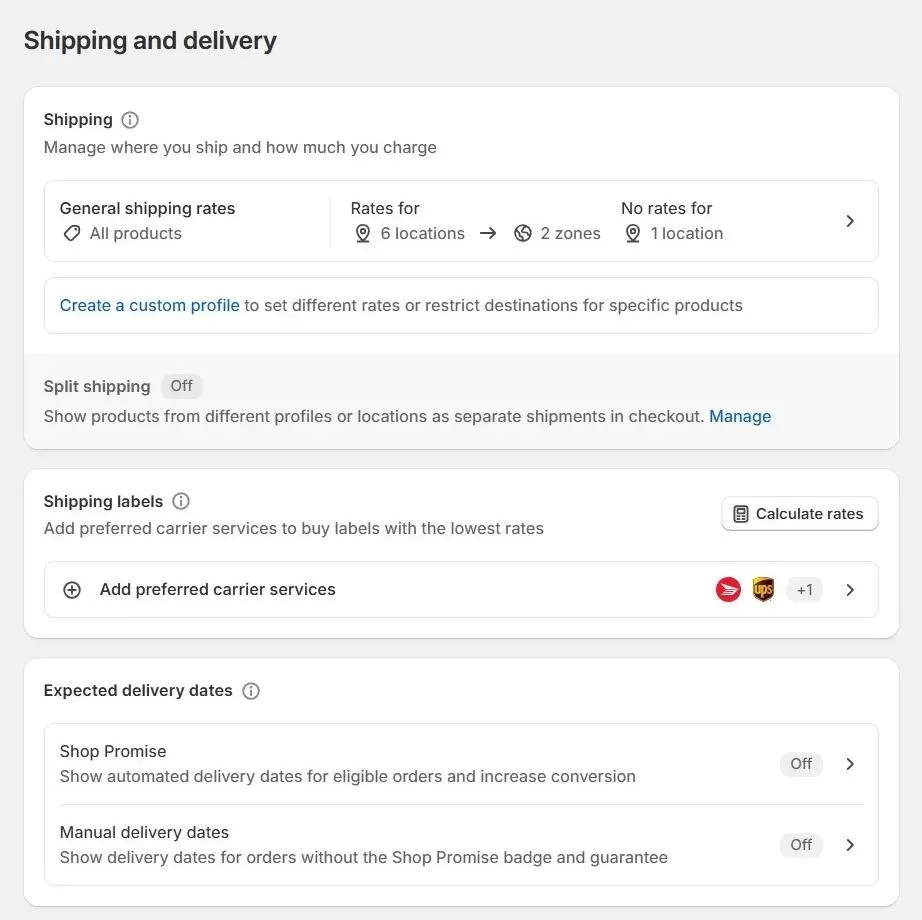
Shopify’s Shipping and Delivery Settings Interface
A common miss during setup is taxes. Shopify won’t add them for you. Go into the settings, turn them on, and set the right rules for your country. If you forget this step, every order will go through without tax, and fixing it later is a headache.
Install Apps to Replace WooCommerce Plugins
WooCommerce plugins don’t work on Shopify, so swap them out with apps:
- SEO help: Smart SEO for automating meta tags, alt text, and JSON-LD, and Plug in SEO to detect SEO issues and provide fixing suggestions
- Email & SMS Marketing: Klaviyo for email automation ( Great for abandoned cart recovery), Omnisend for email and sms marketing on one platform
- Reviews & social proof: Judge.me for customer reviews on products, Loox for adding photo reviews
- Extra features: PageFly (custom pages), ReConvert (post-purchase upsells)
Only add the required apps at first, so your store stays fast and lean.
Step 3: How to Migrate Your Store Data from WooCommerce to Shopify
This stage is the heart of the migration. It is important to move everything: products, customers, orders, and blog posts carefully, so your new Shopify store works just right.
You can do it in the following two ways:
- Migrate using CSV files
- Use a third-party tool for automatic sync
So, which path to take?
Path 1: Move Data by Hand (CSV Files)
This works well for smaller stores and is free. Here’s how it goes:
Step A: Export Products
- Go to WooCommerce→ Products→ All Products.
- Choose Export.
- Pick the details you want, like name, price, image, and SKU.
- Save the CSV file.
Step B: Fit CSV File to Shopify
- Get a Shopify CSV template from their help pages.
- Open both files side by side. Match the column names so they fit.
- Check for missing images or wrong prices.
Step C: Upload to Shopify
- Head to Shopify’s Admin → Product section.
- Use the Import button to add your file.
- Look at the preview—then click Upload.
- If the names don’t match Shopify’s format, it won’t import.
- Product options like size or colour may need double-checking.
Step D: Move Customers
- Export users from WooCommerce (names, email, address) in CSV format
- Import them into Shopify.
- Passwords won’t transfer—customers need to reset them later.
Send your customers a heads-up email before the store switch and inform them to reset their passwords on the new Shopify store.
Step E: Bring Over Past Orders
- Shopify can’t import orders with CSV. Instead, use an app like Matrixify.
- Export orders from WooCommerce Orders→Export
- Use the app to import them into Shopify.
Path 2: Migration Using Apps
This is faster and easier when your store has lots of data. Below are the top data migration apps:
- LitExtension – Moves everything automatically, products, categories, customers, orders, SEO settings, and even logins.
- Cart2Cart – Quick, easy, and keeps your store online while it works.
- Matrixify – Good for bigger stores with special needs or data setups.
Migration Tool Comparison (Quick Reference) |
|||
|---|---|---|---|
| Tool | Best For | Pros | Cons |
| Matrixify | Large product catalogues | Handles complex data; supports metafields | Steeper learning curve |
| LitExtension | Full-service migrations | Done-for-you option; good support | Less control; can be pricey |
| Cart2Cart | Smaller stores or DIY users | Affordable, easy setup | Limited SEO handling |
- If your store is simple and small and has under 100 Products, go manual.
- For a store with over 1000+ products, use an automation tool—it saves time and mistakes.
Step 4: How to Retain SEO Rankings After Migration
When switching from WooCommerce to Shopify, one of the biggest risks is that your URL structure will change. WooCommerce follows a category-based URL format, whereas Shopify uses collections instead of categories. This means that many of your URLs will no longer exist in the same form.
This step helps you do three things:
- Redirect your old WooCommerce URLs to new Shopify ones.
- Let Google know your new store is live.
- Fix all your internal links so they don’t break.
Set Up 301 Redirects to Preserve Your SEO
When you move to Shopify, most of your URLs will change. WooCommerce uses categories in URLs. Shopify doesn’t. So a product that used to live at:
yourstore.com/product-category/shoes
Might now live at:
yourstore.com/collections/shoes
If we don’t redirect that old link, customers (and Google) will see a 404 page. That’s bad for SEO. And even worse for your sales.
That’s why it’s critical to set up 301 redirects.
How to Set Up 301 Redirects in Shopify- Step-by-Step Instructions
Step 1: Find Your Old WooCommerce URLs
Export all the existing URLs from your WooCommerce website. Download:
- List of all indexed pages from Google Search Console.
- Use a plugin like Yoast SEO or XML site Map generator to generate a list of all pages.
- Or just make a list of important ones—homepage, product pages, categories, blog posts.
Step 2: Match Old URLs to New Shopify URLs
This takes a bit of work. Since Shopify doesn’t use categories (e.g., /product-category/hats), you must redirect category URLs to Shopify collections.
You have to map each old link to its new version, such as for product categories, products, and blogs.
Here are some illustrations:
| Old | New |
|
|
|
|
|
|
Step 3: Add Redirects in Shopify
Now that you have the pairs, there are two ways to do it:
Method 1: Adding Redirections Manually ( Recommended for small stores)
- Go to Shopify admin→ Online Store → Content→ Menu→URL Redirects
- Click Create URL Redirect
- Put the old/WooCommerce URL (without your domain) in the first box.
- Next, you need to add the new Shopify URL in the box on the right.
- Save
- Do it for all pages
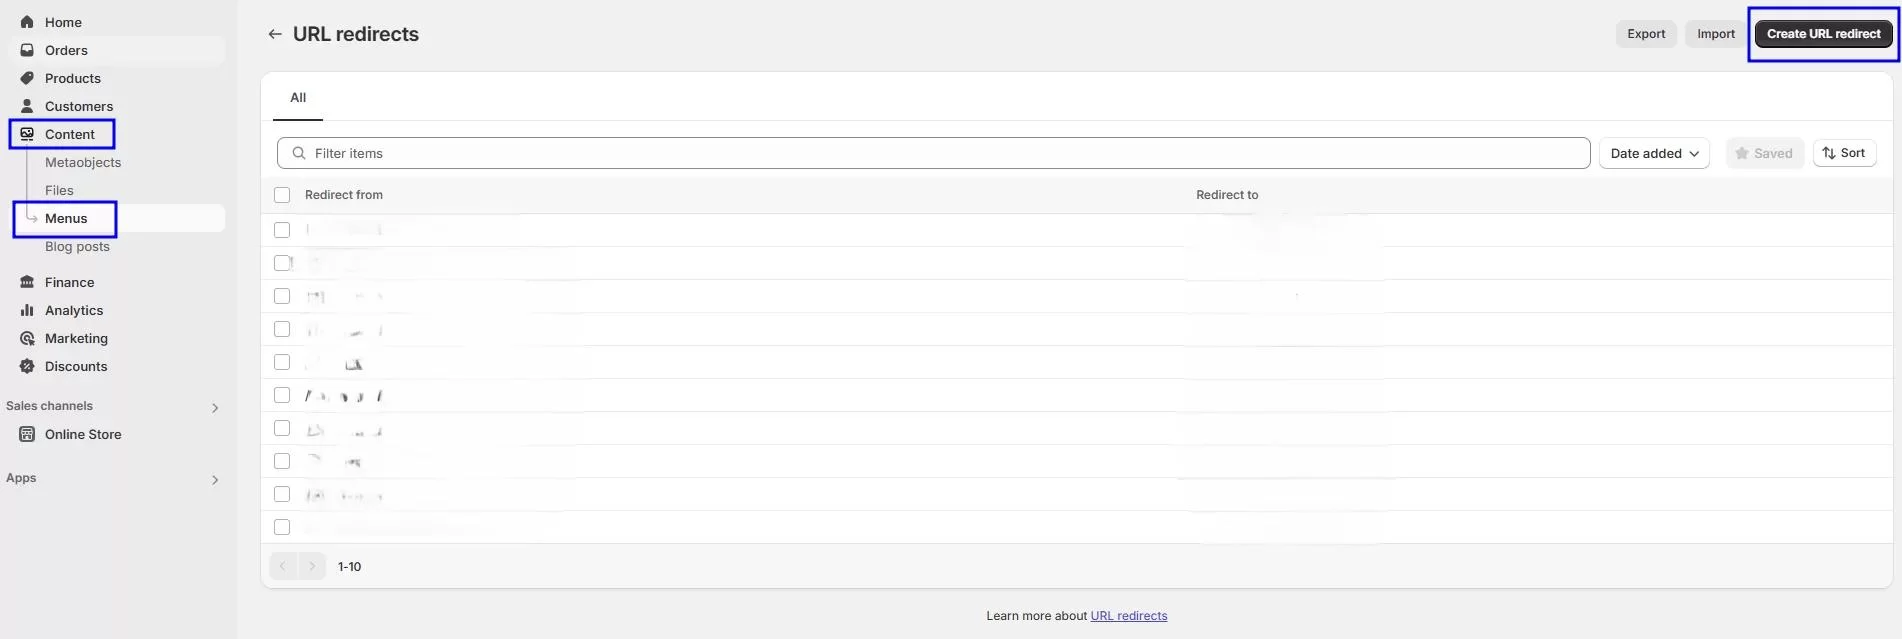
Shopify’s URL redirect settings Interface
Method 2: Use a Shopify Redirect App (Recommended for Large Stores)
If there are 100+ URLs, using a Shopify App to automate the process is recommended
- SEO Manager (auto-creates redirects and finds broken links)
- Easy Redirects (great for bulk import with a CSV file)
After setting these up, run the URLs through a redirect checker to confirm they’re all working.
Submit Your New Store Sitemap to Google
Once the redirects are done, it is time to tell Google to crawl the new Shopify site.
Here’s how to do it:
- Find your Shopify sitemap
Shopify makes one for you. It’s at yourstore.com/sitemap.xml - Go to Google Search Console (search.google.com/search-console)
- Pick your store from the property list (or add a property if it’s new)
- Click Sitemaps in the left-hand menu
- Add a new sitemap, enter sitemap.xml, and hit Submit
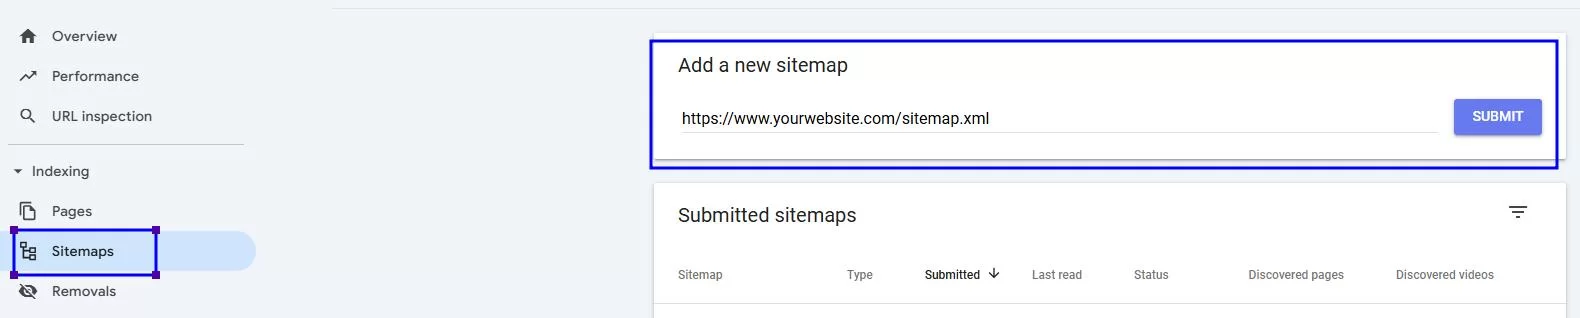
Google Search Console Interface for Submitting New XML Sitemap
Check the Coverage Report inside Search Console after a few days to see what Google found and if there are any crawl issues.
Fix Internal Links
Internal links are links between blog, product pages, and other informational pages. As the migration is completed, check and update any such broken links. These errors are harmful to your website’s SEO and can break the user journey.
After finishing the migration, some links within your store are likely to remain pointing at the old WooCommerce pages, which will result in 404 errors that can ruin the user experience.
Here’s what to check and fix:
- Check all navigation menus, product descriptions, and blog posts, and update them. There are even web applications like Dead Link Checker to check for broken links, too.
- Email Campaigns: Automated emails sent with product links should now be going to Shopify URLs.If you send automated emails with product links, make sure they lead to Shopify URLs now.
- Google Search Console – Continue to monitor 404 pages in the Google Search Console in the first weeks and fix them.
Blogs are the sneakiest and contain links to old products/categories. Most people forget to update those links, but Google still checks them. So, make sure to update them.
Step 5: How to Test Your Shopify Store Before It Goes Live
Test all aspects of your store before it’s live. A tiny checkout flaw or broken menu link can send shoppers elsewhere.
Check the Checkout & Payments
The checkout is the most important part—it’s where people spend their money. Use Shopify’s Bogus Gateway to test this without using real payments.
Here’s how to test payments:
- Log in to your Shopify Admin → Open Settings → Payments.
- Turn off any live payment services, such as Shopify Payments
- Choose a provider → Select Bogus Gateway, Activate, then save.
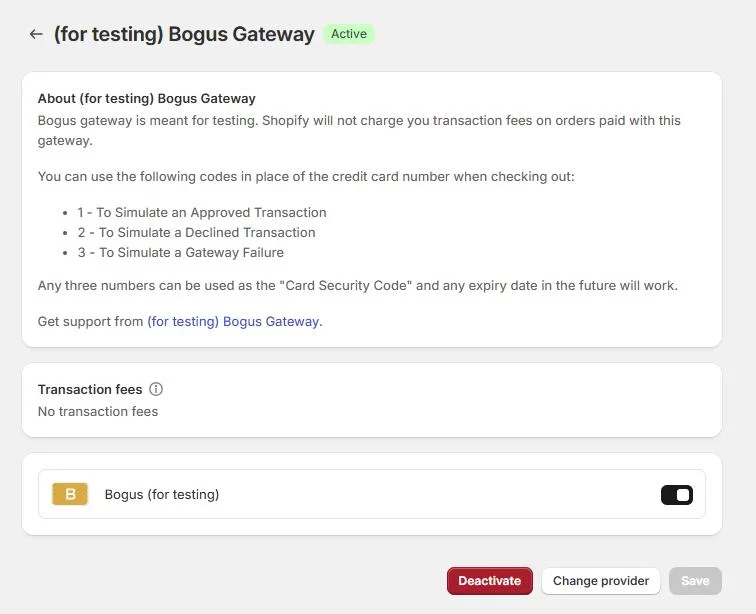
Shopify’s Payment Gateway Settings Interface
How to place a Test Order
- Add a product to the cart.
- Head over to your checkout just like a customer would. When you get to the payment part, use the following Test details:
- Card Number: 1
- Name on Card: Any name
- Expiry Date: Enter a future month and year
- CVV: Enter any three numbers
Submit the order. As a last step, check if you have received the order confirmation email as a customer.
Now review the following closely:
- Did checkout run without errors?
- Was the shipping fee correct?
- Did the discount codes work the way they should?
- Are orders available inside your Orders section in Shopify?
- Did the order confirmation email get sent
Try placing a few different test orders—one with free shipping, one with a discount, and one with a few different items. It helps spot issues early.
Look at Product Pages & Navigation
Shoppers need to find items easily. If they get lost, they leave fast.
Here’s what to Review on Product Pages:
- Confirm images show up on product pages
- Check descriptions look clean
- Make sure prices are right, including sale prices
- Try out sizes, colours, or options (variants)
- See if items fit into the right collections
How to Test Navigation & Search Functionality
- Experience your store like your customer would. Browse like a website visitor from the homepage and try to find a specific product.
- Use the search bar—do relevant results appear?
- Test the main menu, footer menu, and collection filters.
How to Test on Mobile Devices
More than 60% of people shop on phones, so the mobile has to feel easy.
Use Multiple Devices to Test Your Store( Mobile, Tablets):
- Browse products
- Add items to cart
- Try checkout
- Open menus and filters
Use Shopify’s Built-in Mobile Preview Tools
- Log in to Shopify Admin
- Click Online Store, then Themes
- Click Customize
- Preview the site in mobile mode
Check for Common Mobile Display Issues
- Is the text easily readable?
- Do images fit the screen right?
- Do pop-ups hide important buttons?
- Is the checkout easy to tap through?
Also, try to test on different browsers, like Safari and Chrome—some things look different there.
Step 6: How to Launch the Store & Things to Do Next
You have covered a lot. Your store is ready on Shopify. Below is the list of steps to help keep everything smooth for you and your shoppers.
1. Point Your Domain to Shopify
Here’s how to connect your domain to Shopify
- Sign in to where the domain lives—maybe GoDaddy or Namecheap.
- Open its DNS settings and update:
- A record to Shopify’s number: 23.227.38.65
- CNAME for the www part to shops.myshopify.com
- Set a TXT record (shopify_verification) to [value shown in your Shopify account]
- In Shopify admin, under Settings → Domains,
- Choose “connect existing domain,” type in the domain name, and let Shopify check the settings.
- Wait a bit for DNS Propagation —anywhere from a few minutes to two days—for it to kick in. Use What’s My DNS to check the domain status.
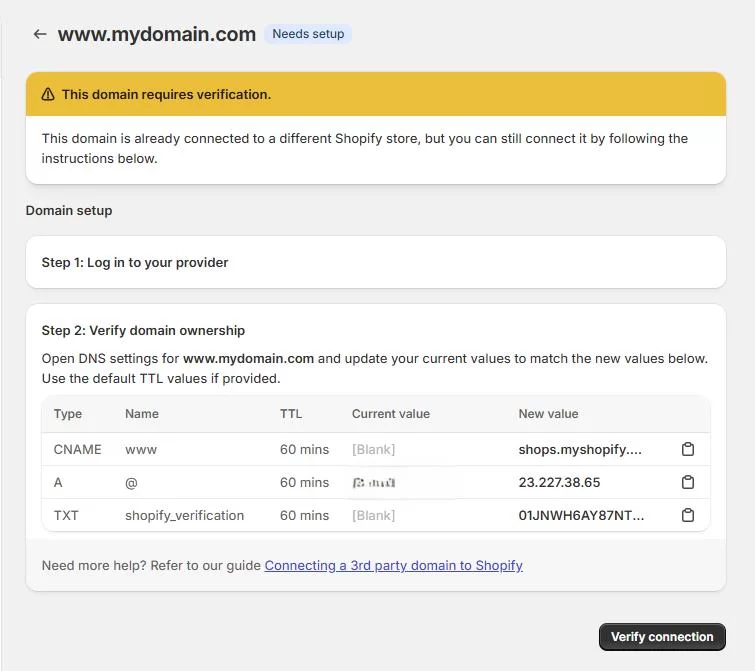
Shopify’s Domain Settings Interface
2. Announce the New Store to Your Customers
Draft a clear announcement email informing your customers what’s changed, the new updates, and how the new system will improve the customer experience. Also, assure them that your team is available should they have any questions (e.g., password reset for my account).
Here’s to Notify Your Customers:
- Email customers: Using an email tool like Klaviyo or any other, tell them that the store got a fresh look, explain if they need to reset their account, and maybe offer a small discount or special offer to celebrate.
- Post on social media: Post the look before and after, keep the post pinned, and answer questions people ask.
- Fix outgoing emails: Unless you have modified, Shopify’s default email format will be used to send emails. Personalize the default format to match the look of the new store and have the correct links.
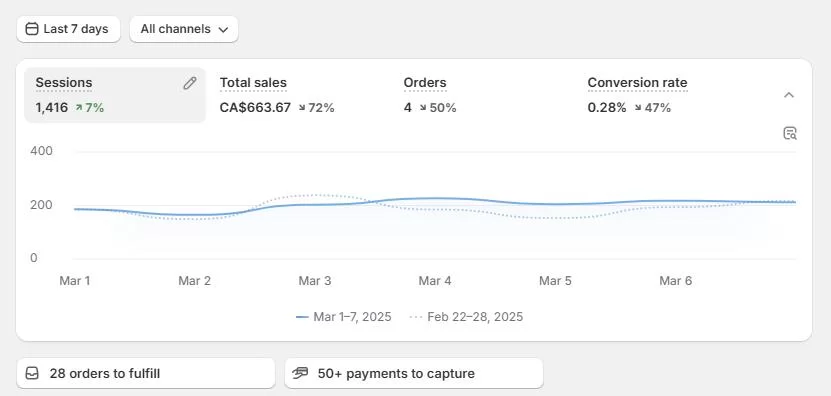
3. Store Health Check After Launch
It’s important to keep close tabs on the store’s health in the first month of launch to ensure you find any errors (e.g., broken links).
Monitor the following:
- Google Analytics (GA4)
- Check Traffic trends- Are people still coming to the store? Are they staying longer?
- Compare the bounce rate and session duration with the corresponding data
- Google Search Console:
- Check if there are any crawl errors and see if the new pages are being found
- Check the Index status and see if there are 404 errors or broken pages, and promptly fix them.
- Shopify Reports:
- Monitor if the orders are coming in like they should. If you find any problems, test the checkout flow to find any errors or issues.
Shopify’s Analytics Interface
- Use Heatmaps and User behaviour tools (like Hotjar):
- Heatmaps are like watching your users browse your website, and are an excellent tool to uncover any friction areas. Install and regularly review to find how customers browse, click, or stop. It will help find confusing UX spots.
After you launch, check Google Search Console every day in the first week to ensure all Shopify Pages are indexed properly and there are no errors.
Bringing It All Together: From WooCommerce to Shopify Without the Headaches
Moving from WooCommerce to Shopify can be overwhelming. However, with a good plan, the right tools, and some care, this shift can be smooth. You’ll keep your data, your SEO, and your customers—without a hiccup.
What This Checklist Helped You Do:
- Moved your products, customers, and past orders safely to Shopify
- Set up redirects so search engines and shoppers find the new pages
- Tested checkout, menus, and mobile view so everything works
- Told customers what’s happening and kept them excited and informed
- Set up your Shopify store to run fast, look good, and bring in sales
Frequently Asked Questions: WooCommerce to Shopify Migration
Migrating from WooCommerce to Shopify raises a lot of practical questions. Below are questions that we receive from our clients and the answers we offer based on our experience.
1. How can I move my WooCommerce store to Shopify?
Migration can be tricky. Based on our experience working on numerous projects, we suggest using one of the following options: a migration app or an experienced migration agency partner. Services like Cart2Cart or LitExtension can handle product, customer, and order data, but they still require setup and testing. Working with an agency ensures that your data is mapped correctly, your SEO is preserved, and custom features don’t get lost in the process.
2. Which data can be migrated—and what usually can’t?
Most standard data—products, customers, orders, categories, tags, pages, and blog posts—can be migrated.
What usually can’t move directly are customer passwords, certain plugin functionality, and highly customized workflows. To move these, you either need an appropriate Shopify app, custom Shopify development, or manual work by an experienced Shopify developer.
3. How does password migration work?
No. The password encryption algorithm at both platforms is different. Therefore, their automatic migration is not possible. Customers will need to reset their password once your Shopify store goes live. A simple email campaign with reset instructions usually solves this smoothly.
4. How do I migrate without losing SEO rankings?
Protecting your website’s SEO requires three steps:
- Implement 301 redirects from your old WooCommerce URLs to new Shopify URLs.
- Migrate all metadata for all categories, products, and informational pages (titles, descriptions, alt text).
- Make sure to verify all data in Google Search Console after launch.
When done correctly, your rankings should stay intact and, in many cases, improve with Shopify’s faster infrastructure.
5. Will migration impact my existing WooCommerce store?
No. Migration is a copy process—your WooCommerce store stays operational while data is being migrated. Once the new Shopify store is prepared, you shift your domain’s DNS to Shopify, and WooCommerce can be kept as a backup until you no longer have use for it.
6. Will my store’s custom features be migrated?
Custom features have to be audited on a case-by-case basis. Most can be duplicated via Shopify apps or theme edits. For more complex workflows, custom development may be required. The main thing is to audit these features before migration, so nothing crucial gets overlooked.
7. Can reviews be moved from WooCommerce to Shopify?
Yes. Use Shopify apps like Judge.me or Loox to migrate the product reviews. However, some formatting may be required to match your website’s design.
8. How do I ensure data accuracy after migration?
A manual post-migration audit is important to uncover any issues. With manual audit,
- Compare the number of products, customers, and total # of orders in both systems.
- Perform spot check SKUs, pricing, and content.
- Consider all test cases and verify checkout thoroughly, and customer accounts.
This QA step is critical to ensure nothing slips through.
9. Will my WooCommerce site go offline during migration?
No. At any point during the migration, your WooCommerce store will not go offline. Once your new Shopify store is ready, you can switch the domain DNS to Shopify. Your customers will hardly notice the change.

Need Help Moving Your Store?
Don’t want to deal with all the moving parts? That’s what we’re here for.
Our Shopify Migration Team has done this many times—we’ll move everything for you, the right way. Your products, your customers, your settings—all safe and working. No stress, no delays.
Let’s talk about your store. Book a free call and we’ll help you move to Shopify without missing a beat.